Tuesday, January 02, 2018

Desperate Lands

For the past two years or so, I've been slowly working on a fine art photography project that I currently call Desperate Lands that will eventually be made into a complete photobook.

I've basically been roaming the local wilderness around my town trying to capture the most abandoned, forsaken and depressing locations I could possibly find to really show how I see this place. Luckily, given the remoteness of the place, that's not very hard to find.

Here's just a few selected images I've shot over the last two years.


I've posted some of these on my Flickr but unfortunately, I've lost my password and I can't login there anymore so I no longer have a place for my photography work.

I've made 12x8 prints of these images and they look stunning.  Hope you're using a color-managed browser and a calibrated monitor as I spent a significant amount of time color grading these ;)

I've been putting a lot of love and sweat into this project. Lugging a bag full of camera gear in freezing weather through mud up to my knees, miles away from civilization, trying to get a perfect angle on the scene.

Anyway, I'll write a lot of stuff about this project, stories behind every image along with technical details as soon as I get my main website at davidkatara.com up and running. That should be done by the end of January 2018. For now, there are details about some of the images on my Flickr.

Hope you dig it.
David.

Saturday, April 22, 2017

Mage's Desk - Update!

UPDATE: May 11, 2017
I've textured the leather cover of the notebook and started sculpting new wooden desk planks which will replace these horrendous, temporary ones.

I've also been experimenting with lighting and color grading as the previous render had this yucky, yellow sunlight.

Here's the latest render:

That filename though: 100-Skylight_ACES_WB6500K_Gamma1.0_SharpDef_24MP-FOR_EXTERNAL_GRADING-ProPhotoRGB_Log_tagged___GRADED_sRGB_tagged_1280px_4web.tiff
Still a ton of work left, most of the scene will be rearranged later, but for now while I'm making assets, I'm keeping it this way.

Anyway, expect more stuff soon, cheers!
David.

Older update

I've been working here and there on my Mage's Desk project lately.

Still deep in the work-in-progress phase, but it's slowly coming together...

Notes
The desk texture is just a temporary placeholder, that's why it's pixelated.

Everything in this scene and renders is 3D including smoke and caustics. No 2D tricks whatsoever will be used. I never liked seeing that stuff because it defeats the purpose of even doing the scene in 3D. If it's "3D art" then keep it in 3D. Only global adjustments like color grading and basic post-processing (grain, etc.) are fine with me.

My PC sucks so I have no idea when will this be finished. Render times are ridiculous. I'm talking days. 3D texturing is pretty much impossible. It ain't easy.

"Mage's Desk" is just a temporary code name, I'll come up with a better name when the time comes.

This scene was originally inspired by a few locations in Skyrim, as I've said in previous posts on it, but it reached a point where I've actually developed quite a bit of backstory with a few characters and a plot and I'm thinking of releasing a (short) story about it one day. As of now, it's a little too rough, just like this image is. There's a lot of work left and not a lot of free time, as always.

Here's one of the recent renders. I did some more work but didn't bother rendering the whole thing again because of render times.

Click to enlarge

And here's a few older renders:
Texturing and shading of this bottle


Older render with no post-processing
PS. I hope you have a calibrated monitor and your browser has a proper color management setup as that's the only way to see the images the same way I do.

Wednesday, July 27, 2016

Where have I been?

Well, well, haven't posted in a while. I've been up to a lot of things.

Last year I worked full-time for Bold Studio Zagreb, mostly doing compositing, FX and some modeling for major local TV commercials, like mobile service providers and whatnot. Good times, made some cool work.

Here's some of the work I did.

Client: Tele2
Job: Smoke simulation (Maya), shading and rendering (Arnold), and compositing (Nuke)

Working on the foreground smoke sim

More tweaking

Compositing in Nuke

Final shot

All images are property of their respective owners and no copyright infringement is intended.


Anyways, that's it, just wanted to put out a quick update. Overall, things are going pretty well.

Cheers,
David.

Friday, April 03, 2015

Got a job!

Quick update, I got a job at Bold Studio Zagreb a few weeks ago, doing mostly FX, lighting, rendering and compositing for commercials and film. These guys are like one of the top 3 studios in my entire country. So that's pretty badass.

There's so much been going on recently and so little time, so I just thought to give you a quick heads up on what's up with me!

Cheers!

Friday, February 13, 2015

Torso Anatomy Study in ZBrush + Timelapse Video!

Just wrapped up another torso study, this time a more accurate one.
I also recorded it all in ZBrush. Here's a timelapse video:


Here's a 1080p render of it:


Lighting kinda sucks, but I'm working on a new scene for showcasing my models, so when I figure it out, I'll post a new render soon!

Cheers,
David

Tuesday, January 27, 2015

Grass R&D

Been doing some grass R&D for my train station scene. Here's a 1080p render.

Click to enlarge.


Cheers!
David.

Thursday, January 22, 2015

ZBrushin' stuff

Last few days I've been ZBrushing like crazy. I've started a daily sculpting challenge 6 days ago and I've been learning anatomy hardcore for a week or two now.

Here's a speed-sculpt of a torso fragment done in about 45 minutes.

ZBrush and Blender Cycles for rendering.
Pretty decent for one of my first torsos ever. But there's plenty of room for improvement!

Also, here's some random environment stuff I think is pretty decent for a 30min-1h sculpt.
I freaking love environment modeling, it's just that my computer can't really handle more than 1mil polys in ZBrush, framerate starts dropping down a lot around 600k.

Block-in in Maya, speed-sculpt in ZBrush, rendered in Blender

Speed-sculpt in ZBrush, rendered in Blender
That's it for today, I'm back onto studying anatomy as I really wanna do characters. I'll be posting more of ZBrush stuff soon!

Thanks guys,
David.

PS. I'm not currently working on my railroad station scene because I wanna seriously get some character modeling skills and also, my machine can't handle the polycount, when I added grass and modeled a few trees, I quickly hit like 70mil polygons. I'm using instances but still, viewport lags a lot so I'm planning on getting a new machine ASAP.

Monday, December 29, 2014

Train Model DONE

Finished it a few days ago, forgot to share here, I'm already halfway done unwrapping it.


Cheers!

Sunday, December 07, 2014

New WIPs

Here are some fancy WIP AO renders of my latest project's train model.


For more pics and info, check out my thread on CGTalk here: http://forums.cgsociety.org/showthread.php?f=43&t=1236720

More stuff soon!
David.

Wednesday, November 26, 2014

Started A New Project!

I've thought about keeping it a secret, but screw it—I like the community aspect of art and I just started a WIP thread on CGTalk about the new project.

It's a complex exterior scene of a nearby railroad station. Here's a previs/scene layout screenshot

Here is the thread with pics and more info: http://forums.cgsociety.org/showthread.php?p=7942083

I'll be updating it daily.

Cheers,
David.

Wednesday, November 19, 2014

BMW M3 VFX Project - Done! + IN-DEPTH Making-Of!

Finally, after 10 months of slow and steady work, it is finally done and done!
Feast your eyes, my friends!

Please click on the HD or the link below because it's ridiculous to watch it any lower.


Making-Of

The modeling of BMW can be seen in numerous older WIP posts on my home page here, just scroll down.

So, let's dive in the VFX stuff.

Blender - Camera Tracking

I shot the footage with my Fujifilm HS10 bridge camera and it's tiny sensor in 1080p in my backyard. (Yes, that is unfortunately my backyard, but I'm moving out soon :)

The camera was mounted on a tripod which I held in my hands to stabilize it a little bit. You can actually see the shadow of me holding it.

Converted the footage into an image sequence and loaded it up in Blender to track it. Even though I have copy of PFTrack 5, nowadays I prefer Blender. It got real good.

The footage is pretty damn compressed so it was tough. All 604 frames that I tracked were done by hand (Blender has no "auto-track the entire footage" thing), adding tracking points manually, tracking them with Ctrl-T and tweaking them to perfection. Took a crazy amount of time, but it was fun.


Got just 0.245 solve error. Lens distortion was solved as well, and focal lenght and optical center were slightly refined.
Here's the scene. The car is actually off scale and place here, I just used it to check does it stick well.


Exporting the tracked camera to Maya was a nightmare. It took me literally two days to figure it out. The camera was off, or flipped over, not even rotated like when the axes are wrong. Way off.
Finally, I found the solution and posted it as a response to someone's question on BlenderArtists.org here if you need it.

Maya & VRay - Scene assembly, lighting, shading, rendering


I started by creating the shaders. VRayCarPaintMtl was used for the car body, while others are the usual VRayMtl.
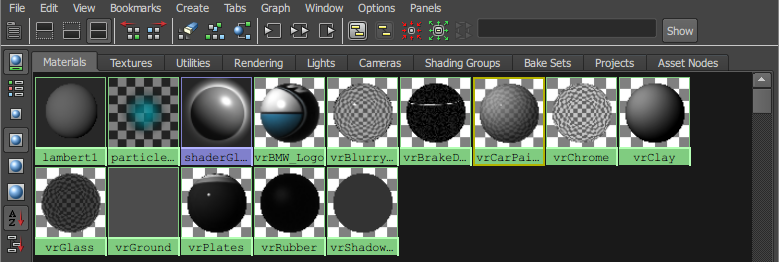
All shaders in the scene

The fun part was the ground plane. I used the VRayShadowCatcher, but it's linked to a VRayMtl that gets its diffuse texture from the camera projection of the original footage.

Here's the actual shader network pic.

Here is what the camera projection looks like:


I used camera projection so that the reflection of the car would show properly on the ground ie. some of the light bounces off the car at the ground making the ground brighter if you look closely in the video.


Lighting

Lighting was done using two sources, IBL dome and VRaySun.

I shot a DIY light probe which is actually a plastic reflective Christmas ball attached to a pen.
Yes, most indie projects (well, at least mine) tend to always be crazy like this.


I shot a ton of exposures from a few angles, stitched and aligned it in Photoshop and made the HDRI environment map in Picturenaut if I recall correctly.

Plugged that into a VRayDome light and aligned the VRaySun so it matches the actual sun position from the HDRI.


Rendering
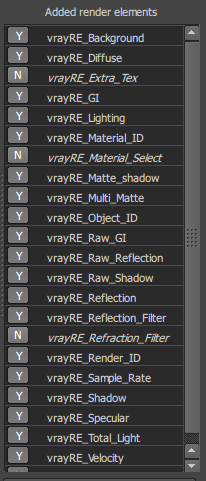
The camera was VRayPhisicalCamera for obvious advantages.

For GI, I used an irradiance map and light cache. I first precalculated the light cache and IR map for the entire shot duration. I had to re-do this a few times to get decent quality maps that don't flicker too much.

I used the adaptive subdivision sampler because DMC was oversampling some areas needlessly.

Everything was rendered to EXR files with a ton of passes as you see on the left.


Rendering 604 frames took around 50 hours with an average of 5min/frame. I did a ton of test renders before doing the final batch render.


Nuke - Compositing
The script started out simply, but ended up being really big and complex. I had to compensate and fix a lot of stuff that's not right in the renders, but rerendering for another 50h was not a (fun) option. Besides, doing compositing is one of my favorite parts of the project.

Because of my lens distortion workflow, I had to re-render about 30 frames with the zoom factor 0.8 which basically widens the FOV/shortens the focal length of the camera. Since the shadow in the raw undistorted renders gets out of the frame when the car gets close to the edge of the frame, there was no shadow data when I distort the render in Nuke. Once I re-rendered it, I animated a Switch node to switch to the new fixed and wider 1600x900 renders which were cropped to 720p so the FOV matches.

Here's the screenshot of that part of the node graph:
Pretty simple stuff. I just had to translate the new renders a few pixels; for some reason they were off slightly. Immediately after the switch, I put the LensDistrotion so I don't have to worry about it. Yes, it slows down the graph because it distorts passes that aren't even used but I didn't care. It was pretty fast anyways.


I merged the passes manually so I can control them individually. The reflection flicker mask part is exactly what it says. There's a slight but visible flickering just above the tires and below the hood from the crappy irradiance map. That was totally removed because it's supposed to be dark.

I also masked out the rims using VRayRenderID pass to control the specular and reflection pass.


Grading the shadow was also a tough challenge because of the weird alpha output due to the VRayShadowCatcher. It took me a while to realise that darkening the shadow was actually done by increasing the gain on the alpha channel. Duh, because the RGB data in that area is black.

I won't get into too much detail (it's already too detailed :) but that's about as interesting for you guys as it gets.

The entire script outputs a PNG image sequence.


Video editing and rendering
The final video that you watched above was edited in Blender. Blender has its quirks and it's not the best, but it's open source and good enough for me.

But let's actually get to the fun part of this.

Blender outputs useless h264 videos that literally freeze my entire computer when I play them in any player. I rendered the image sequence but there was no music obviously.

I tried making a h264 mov in Nuke by giving it the sound file but it doesn't work as Nuke has no idea what FLAC is. The actual way I solved this was like this.

I downloaded AviSynth which is a sort of a script based video editing/frameserver software. I had to write a script that dubbed the FLAC with the image sequence. Played it and it worked.

Then I used FFMPEG to actually render that script into a final file.

This whole process took me an entire day of struggling to make a proper render just because Blender's videos were crashing my PC.


Final words

This 10 month project was a shitload of fun. I did it on and off and there were a few weeks I didn't even touch it.

If you have any questions about the process, or anything really, feel free to ask in the comments below.

For job offers email me at: artofdavidg@gmail.com
I do a lot of stuff as you can see, but I'm focusing mostly on modeling and that's what I spend most of my time on.

Hope you liked it!
Thanks for reading!
David..

Sunday, November 09, 2014

Anatomy stuffs + BMW M3 VFX Project Update

Alright, this time I've got some more art for ya'
I got back doing 3D fulltime now and I'm back for real. I'm devoting all my time to working on projects and sculpting. Expect new posts at least once a week.

I pulled out some of my anatomy books, opened ZBrush and dove in. 30min later I got this. It's not that good, but not that bad either for my first attempt ever at the torso sculpt. Fuckin' great. I'm super excited to sculpt all day.

That BMW M3 VFX project is almost done, all frames rendered (~40h for 604 frames), I'm just doing some final tweaks in Nuke, it looks pretty awesome! It should be fully done in at most two weeks.

Here's a render of the torso sculpt.


Tuesday, October 14, 2014

I'm back + New photography work!


So, after months of not posting anything, I am back with lots of new photos. Got tons of emails from my art buddies asking where the hell am I.

My SD card reader was dead for months and I finally got a new one today so I sat down and spent and entire afternoon going thru 8 gigs of raw shots and editing just a few great ones.

All shot on Fujifilm HS10 and color-graded in Photoshop/ACR usual.
I took me literally almost two hour to grade some of the shots here. I love fiddling with the subtle tones and hues.

Update on life: I am currently just about to launch my business and it’s a lot of fun, but I miss doing 3D and painting. A lot. I’m just busy as hell. Occasionally when I have some time off, I grab my camera and go out for a walk or something. That’s how most of these photos came to be.

Enjoy, I'll be back soon with more. Soon, not in like 6 months later :)
David.

Click on them to enlarge.
PS. If you want a higher res for a wallpaper or something, just hit me up at artofkatara[at]gmail[dot]com, I just don't usually post higher than 1280 online.

Or you can buy prints on my deviantArt here: davidkatara.deviantart.com

sunrise

sunrise stuff

badass crow behind my backyard, shot early in the morning

dusty windows covered in cobwebs, iso3200 so it's grainy but the grain is just gorgeous

Monday, April 28, 2014

BMW VFX sneak peak

Sneak peak at my latest VFX project.

Shot some random stuff in my backyard and tracked the footage in Blender and I want to comp my BMW in it.
Currently I'm jumping back and forth between Maya and Nuke tweaking stuff. There's a ton of tweaking to do, I'm struggling with render passes atm. The VRay shadow catcher with that -1 alpha is giving me headaches. I have to make the shadow darker but I can't even comp all the passes properly to match the RGB output because of that weird shadow catcher alpha and stuff.

But I'll figure it out.


Shadows suck, glass sucks because of the lighting, I might have to model some interior as well.
Back to work, more stuff soon.

David.

Monday, April 21, 2014

Sketchbook

I started a new sketchbook on Crimson Daggers recently and I'm painting every day and posting stuff there, feel free to check it out, here's the link: http://crimsondaggers.com/forum/thread-4988.html